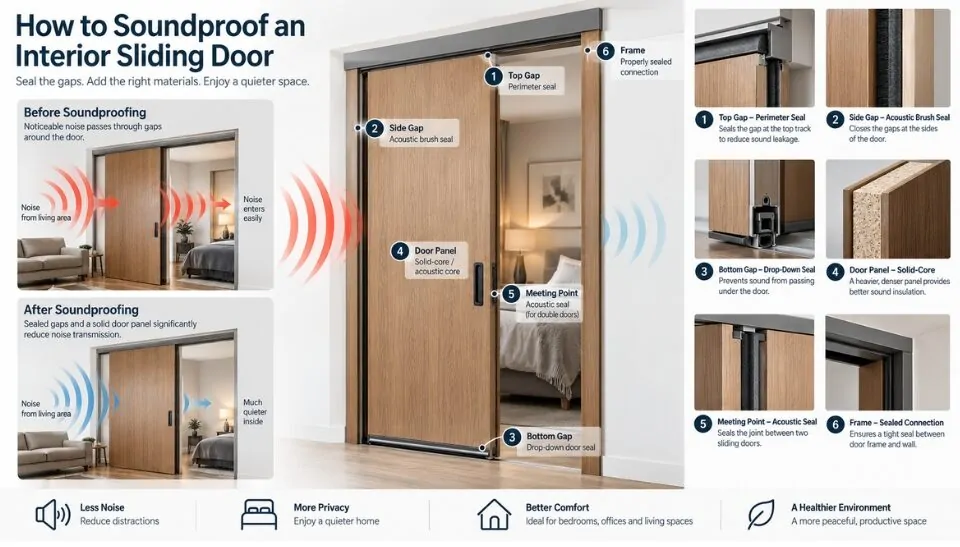
Soundproofing an interior sliding door starts with sealing the gaps around the door, then improving the mass and acoustic construction of the door panel where necessary. If you’re wondering how to soundproof sliding doors, the first step is to identify where sound is leaking through. Because sliding doors need clearance to move, they are generally more challenging to soundproof than well-sealed hinged doors.
The most effective solution depends on the type of sliding door, the existing frame, the source of the noise and the level of acoustic privacy required. Learning how to soundproof sliding doors effectively may involve adding perimeter seals, upgrading the door panel, using acoustic glazing or modifying the complete door assembly for higher-performance applications.
- Why Sliding Doors Are Difficult to Soundproof: Sliding doors require clearance for movement, creating sound-leak paths around the bottom, sides, top track and meeting points
- Soundproofing by Door Type: Barn doors, pocket doors and glass sliding doors require different approaches based on their construction, gaps, glazing and hardware
- Seal the Main Gaps First: Controlling perimeter gaps is usually the first step before adding mass or upgrading the door panel
- Upgrade the Door Assembly When Needed: Solid-core panels, acoustic materials, laminated glazing and purpose-designed seals can improve acoustic performance when basic sealing is not enough
- Balance Acoustic Performance and Operation: Any upgrade must remain compatible with the door’s rollers, tracks, frame and automatic operator where applicable
- Consider the Complete System: Effective soundproofing depends on the door panel, seals, frame, hardware and surrounding wall—not just one component
Key Things to Consider When Soundproofing a Sliding Door
Before choosing a soundproofing product, inspect the door, gaps, hardware and surrounding wall to identify the main path through which sound is travelling. This helps you choose the right solution for the door type, acoustic requirement and available budget, while avoiding modifications that could affect normal door operation.

Before choosing a soundproofing solution, focus on the factors that have the greatest impact on acoustic performance. Gaps, door mass, door type, hardware and the surrounding structure should be assessed together, because improving only one part of the system may not deliver the expected noise reduction.
- Seal the Main Sound-Leak Paths: Start with the bottom, sides, top and meeting points. Brush seals, weatherstripping, perimeter seals or drop seals can reduce sound leakage, but they must allow the door to operate normally
- Choose the Right Door Material: Lightweight hollow-core panels generally provide less resistance to airborne sound than heavier solid-core or acoustic constructions. For glass sliding doors, laminated or acoustic laminated glass may provide better sound-control performance
- Consider the Complete Door Assembly: Acoustic performance depends on more than the door panel. The frame, seals, glazing, track, hardware and surrounding wall can all become sound transmission paths
- Match the Solution to the Door Type: Barn doors, pocket doors and glass sliding doors have different acoustic limitations. A solution that works for one system may not be suitable for another
- Balance Soundproofing With Door Operation: Adding seals or heavier materials can increase friction and load. Check rollers, tracks, guides and automatic operators before making modifications. For automated systems, see automatic sliding door control logic to understand how door movement and control functions interact
- Set Realistic Acoustic Expectations: Basic sealing can reduce everyday noise leakage, but higher levels of acoustic privacy may require a purpose-designed door assembly or a complete system upgrade
How to Soundproof Different Types of Interior Sliding Doors
The best way to soundproof an interior sliding door depends heavily on its construction. A barn door, pocket door and glass sliding door have very different acoustic weak points, so the solution should be matched to the way each system is built.
The first step is to identify where sound is bypassing the door. In most sliding systems, the biggest challenge is not simply the material of the door panel but the gaps between the panel, wall, floor, frame and meeting points. Once these sound paths are addressed, the door panel itself can be upgraded where additional acoustic performance is required.
How to Soundproof a Sliding Barn Door
A sliding barn door is one of the more difficult interior door types to soundproof because the panel normally sits in front of the wall rather than inside a sealed frame. This leaves gaps along the sides, top and bottom that can allow sound to travel around the door instead of through it.
For a barn door, the recommended sequence is:
Identify gaps → Seal the perimeter → Reduce the bottom gap → Increase panel mass → Add a secondary acoustic barrier if required

Step 1: Check the Gap Between the Door and Wall
Start by looking at the gap between the back of the barn-door panel and the wall.
Because the panel needs to move freely along the track, it cannot normally be pressed tightly against the wall like a conventional hinged door. This creates a direct path for airborne sound.
Measure the gap at several points rather than checking only one location. A door may sit closer to the wall at one end and further away at another because of the wall surface, track alignment or door construction.
Step 2: Seal the Side Gaps
Side gaps are another common sound path.
Suitable brush seals, acoustic weatherstripping or flexible perimeter seals can be installed along the sides where they can maintain contact without preventing the door from sliding.
The objective is not to completely clamp the door against the wall. Instead, the seal should create a flexible barrier that reduces the open air path while allowing normal movement.
Step 3: Address the Bottom Gap
The bottom gap is often one of the most noticeable weaknesses because the door needs clearance above the floor.
Possible solutions include:
- Brush seals
- Flexible bottom seals
- Door sweeps where compatible
- Automatic drop seals
- Secondary threshold or acoustic barrier solutions
An automatic drop seal can be particularly useful when the door needs clearance while moving but requires a seal when closed. Commercial sliding-door drop seals are specifically designed to retract during opening and engage when the door closes. Some tested systems can achieve substantial acoustic performance when installed as part of the appropriate door assembly.
Step 4: Increase the Mass of the Barn-Door Panel
If the barn door is made from a lightweight or hollow-core panel, sealing the perimeter alone may not be enough.
Consider:
- Solid-core timber
- Dense MDF layers
- Acoustic composite panels
- Mass-loaded vinyl (MLV)
- A heavier replacement door slab
The principle is straightforward: once the major gaps have been addressed, increasing the mass of the panel can improve its resistance to airborne sound transmission.
However, additional weight also affects the rollers, track and mounting hardware. A heavier acoustic panel should therefore be checked against the load rating of the existing sliding hardware and operator where applicable. See How Do Automatic Doors Work? for an overview of automatic door components and operation
Step 5: Consider a Secondary Acoustic Barrier
If the barn-door design still allows significant sound transmission, a secondary acoustic barrier may be more effective than continually adding surface-mounted seals.
This could involve an acoustic curtain, secondary panel or another layer positioned between the noisy and quiet spaces.
However, these should be treated as supplementary solutions. If high acoustic privacy is the priority, the fundamental limitation of the barn-door configuration may justify changing to a more enclosed sliding-door system.
How to Soundproof a Pocket Door
Pocket doors can have better acoustic potential than barn doors because the door can sit within a dedicated pocket frame and close against a more controlled perimeter.
However, the acoustic performance depends heavily on the wall cavity, jambs, seals, door core and closing mechanism.

A properly designed acoustic pocket-door system can use multiple components together to seal the perimeter rather than relying on the door slab alone. For example, dedicated acoustic pocket-door systems can incorporate acoustic panels, jamb seals, gaskets and weatherstrips that activate when the door closes.
Step 1: Inspect the Wall Cavity
The wall surrounding a pocket door is part of the acoustic system.
If the wall cavity is lightweight or poorly insulated, sound may travel through the wall even after the door itself has been upgraded.
For a new installation, consider:
- Acoustic insulation within the cavity
- Appropriate wall lining
- Reduced flanking paths
- Suitable pocket-door framing
- Separation between opposing wall surfaces where required
For an existing pocket door, investigate whether the wall construction is contributing to the problem before investing heavily in the door panel.
Step 2: Improve the Door Jambs
The jambs provide the transition between the moving panel and the fixed wall.
Acoustic pocket-door systems may use specially designed jambs with channels for gaskets and seals. When the door closes, these components can reduce the open perimeter around the panel.
For an existing door, check:
- Vertical gaps
- Closing-edge gaps
- Jamb alignment
- Damaged seals
- Areas where the door does not sit evenly
Step 3: Install Perimeter Seals
The goal is to create a more continuous acoustic boundary around the closed door.
Depending on the system, this can include:
- Vertical seals
- Jamb gaskets
- Top seals
- Bottom seals
- Meeting-stile seals
A purpose-designed acoustic pocket-door system can activate these seals when the door closes, providing a much more controlled seal than simply sticking weatherstripping onto the panel.
Step 4: Upgrade the Door Core
If the existing pocket door is lightweight, consider a solid-core or acoustic door panel.
A heavier panel can improve resistance to airborne sound transmission, but the existing pocket frame and hardware must be capable of supporting the additional weight.
This is particularly important when retrofitting an existing pocket door because increasing the panel weight can affect:
- Rollers
- Track
- Door guides
- Opening force
- Closing operation
Step 5: Consider the Retrofit Limitations
Retrofitting an existing pocket door can be significantly more complicated than improving a new system.
The wall may already be finished, the pocket frame may not accommodate thicker seals and the existing hardware may not support a heavier door.
If the acoustic requirement is high, it may be more cost-effective to upgrade the complete pocket-door assembly rather than continually adding individual products.
1ECLISSE — ECLISSE Acoustic Sliding Pocket Door System. Date of access on 18/09/2026↓How to Soundproof Interior Glass Sliding Doors
Interior glass sliding doors require a different approach because the acoustic performance depends heavily on the glass specification and the complete framing system.
A thick piece of standard glass should not automatically be considered a high-performance acoustic solution. The glass type, thickness, laminated construction, perimeter seals and meeting points all need to work together.

Step 1: Identify the Existing Glass
First determine whether the door uses:
- Single glazing
- Laminated glass
- Acoustic laminated glass
- Double glazing
- Different glass thicknesses
If the existing door uses basic single glazing, upgrading the glass specification may provide a more meaningful improvement than adding surface treatments.
Step 2: Consider Laminated Glass
Laminated glass uses multiple glass layers separated by an interlayer.
For acoustic applications, the interlayer can help reduce the transmission of airborne sound through the glazing compared with a basic single-glazed configuration.
However, the actual acoustic performance depends on the specific glass make-up and complete tested assembly, so a generic claim about a particular STC or dB improvement should be avoided without product test data.
Laboratory acoustic testing of doors, glazing and other building elements is covered by ISO 10140-2, which specifies methods for measuring airborne sound insulation.
2ISO — ISO 10140-2:2021 Acoustics — Laboratory measurement of sound insulation of building elements — Part 2: Measurement of airborne sound insulation. Date of access on 18/09/2026↓
Step 3: Consider Acoustic Laminated Glass
Where higher acoustic performance is required, acoustic laminated glass can be considered.
The important point is to specify the glazing as part of the complete door system rather than treating the glass as an independent component.
Check:
- Glass thickness
- Glass composition
- Interlayer specification
- Panel size
- Frame compatibility
- Weight
- Sliding hardware capacity
Step 4: Seal the Meeting Stiles
The meeting point between two sliding panels can become a major sound path.
If the doors meet in the centre, inspect the vertical gap carefully.
Potential solutions include:
- Meeting-stile seals
- Interlocking profiles
- Flexible acoustic seals
- Magnetic closing systems where compatible
The seal needs to close the sound path while still allowing the panels to move correctly.
Step 5: Improve the Perimeter
Glass sliding doors can also lose acoustic performance through gaps around:
- Bottom edge
- Side edges
- Top track
- Meeting stiles
- Frame connections
A drop seal can be particularly useful at the bottom where a permanent compression seal could interfere with sliding operation. Purpose-designed sliding-door drop seals are available for glass systems and can be engineered to retract during opening and seal when closed.
Step 6: Check the Frame and Hardware
Upgrading the glass does not automatically upgrade the complete door.
A heavier glass panel can change the loading on:
- Rollers
- Tracks
- Guides
- Door frames
- Automatic operators
For an automatic glass sliding door, this becomes especially important because additional weight or friction can affect the operator’s performance. For more information on maintaining reliable automatic door operation, see How to Maintain Automatic Sliding Doors.
What Is the Best Material for a Soundproof Sliding Door?
| Door / Material | Acoustic Potential | Main Advantage | Main Limitation | Best Application |
| Hollow-core door | Low | Lightweight and affordable | Limited acoustic mass | Basic interior separation |
| Solid-core door | High | Greater mass | Heavier | Bedrooms, offices, living areas |
| Laminated glass | Moderate–High | Good option for glazed systems | Higher cost | Interior glass sliders |
| Acoustic laminated glass | High | Designed for improved sound control | Requires suitable framing | Premium acoustic applications |
| MLV + door panel | Moderate–High | Adds mass without replacing the whole panel | Installation complexity | Door upgrades |
For a conventional interior sliding door, sealing the gaps and increasing door mass generally provides a more effective strategy than relying on a single acoustic material. Glass systems require particular attention to the complete glazing and framing assembly.
How Much Does It Cost to Soundproof an Interior Sliding Door?
The cost to soundproof an interior sliding door can range from $15–$100 for basic DIY sealing to $1,000–$2,500+ for major upgrades, depending on the door type, materials and installation complexity.
| Solution | Indicative Cost | Best For |
| Brush seals / weatherstripping | $10–$50 | Small gaps |
| Bottom seal / door sweep | $15–$80+ | Bottom gaps |
| Acoustic curtain | $200–$400+ | Secondary barrier |
| Professional sealing | $150–$350+ | Multiple gaps |
| Solid-core replacement | $400–$1,200+ | Lightweight doors |
| New barn door system | $2,000+ | Major upgrade |
| New sliding/pocket system | $550–$1,500+ | Full replacement |
These are indicative Australian ranges. Actual costs depend on the door, hardware, site conditions and labour.
What Is the Cheapest Way to Reduce Noise?
The cheapest option is usually to seal existing gaps before replacing the door panel. Basic weatherstripping, brush seals and door sweeps can provide a low-cost improvement, while acoustic curtains offer a more substantial upgrade.
- Weatherstripping: $10–$30
- Brush seals: $12–$50
- Bottom seals: $15–$80+
- Acoustic curtain: $200–$400+
Focus on the largest sound-leak paths, especially the bottom, sides and meeting points.

When Is a Door Upgrade More Cost-Effective?
Replacement makes more sense when the existing door is lightweight, hollow-core or poorly fitted and cannot be effectively sealed.
Consider upgrading when:
- The panel is lightweight or hollow-core
- Large gaps cannot be sealed without affecting movement
- The track cannot support a heavier acoustic panel
- Higher acoustic privacy is required
- Retrofit costs approach the price of a replacement
Australian guides typically place solid-core internal door replacement around $400–$800, while more substantial sliding-door projects can cost $550–$1,500+, depending on the system and site conditions.
DIY vs Professional Sliding Door Soundproofing
| Approach | Suitable For | Benefits | Limitations |
| DIY sealing | Minor noise leakage | Low cost | Limited performance |
| Brush/drop seals | Perimeter gaps | Practical improvement | Requires correct fit |
| Door-panel upgrade | Lightweight doors | Adds mass | May require hardware changes |
| Acoustic glazing | Glass doors | Better acoustic performance | Higher cost |
| Full professional upgrade | High privacy/noise requirements | Holistic solution | More expensive |
Which Soundproofing Improvements Can You Do Yourself?
You can handle basic improvements such as:
- Weatherstripping
- Brush seals
- Bottom-gap seals
- Acoustic curtains
When Should You Use a Professional?
Professional help is recommended for:
- Persistent noise transmission
- High acoustic privacy requirements
- Commercial applications
- Glass-door replacement
- Pocket-door wall modifications
- Structural or framing changes
FAQs
Achieving 100% soundproofing is generally impossible with a sliding door because the sliding mechanism requires certain gaps and clearances for the panel to move properly. However, you can significantly reduce noise transmission by sealing these gaps and increasing the mass of the door panel. With the right combination of materials and sealing methods, it is possible to block around 70% to 80% of noise, depending on the door construction and installation.
Pocket doors are generally much better for soundproofing than barn doors.
- Pocket doors: When closed, the door panel sits within a recessed wall frame and closes against a more controlled jamb. This configuration helps minimise the gaps through which sound can escape
- Barn doors: The panel typically needs to remain around 1–2 cm away from the wall to move freely without rubbing. This open perimeter creates a significant pathway for sound to travel around the door rather than through the panel
The most effective approach is to seal the entire perimeter using heavy-duty weatherstripping together with a dense door sweep.
Sound can travel through the same air gaps that allow drafts to pass. Therefore, even a thick or heavy door panel may provide limited acoustic performance if there are open gaps around its edges. Installing high-quality rubber gaskets, such as D-profile seals, or dense acoustic brush strips along the main contact points can help close these sound paths and reduce noise leakage.
No. The acoustic performance of a sliding door depends on its construction, density and glazing specification rather than simply whether it is made from glass or wood.
- Glass doors: Standard single-pane glass generally provides limited sound insulation. However, double-glazed units or laminated acoustic glass with a PVB interlayer can provide significantly better noise reduction than basic glazing
- Wooden doors: Hollow-core wooden doors are lightweight and typically provide poor sound insulation. In contrast, solid-core or solid-wood doors have greater mass and density, which can provide much better resistance to airborne sound transmission
It can, but the increase should be minimal when the system is correctly designed. Tight acoustic seals can create additional compression and friction when the door is fully closed, meaning slightly more force may be required to break the seal when opening. A heavier acoustic panel can also increase the load on the rollers and track.
Once the seal is released, however, the door should continue to slide smoothly. Any soundproofing modification should be selected and installed so that it does not significantly affect the door’s normal movement or hardware performance.
How Can Digital Home Systems Help?
Digital Home Systems can assist with:
- Automatic sliding-door systems and installation solutions — see Automatic Swing and Sliding Doors
- Sliding-door operators and control systems
- Access-control integration
- Safety devices
- Door hardware and sealing considerations
- Selecting the right automatic sliding door kit for specific applications
Final Thoughts
The most practical approach to sliding-door soundproofing is:
Seal → Add Mass → Upgrade the Assembly
Start by identifying and sealing the main gaps, then improve the door core or glazing where necessary. If higher acoustic performance is required, consider upgrading the complete door assembly rather than adding multiple retrofit products.
Soundproofing performance depends on the complete door system—not just the door panel.